
INTRODUCTION
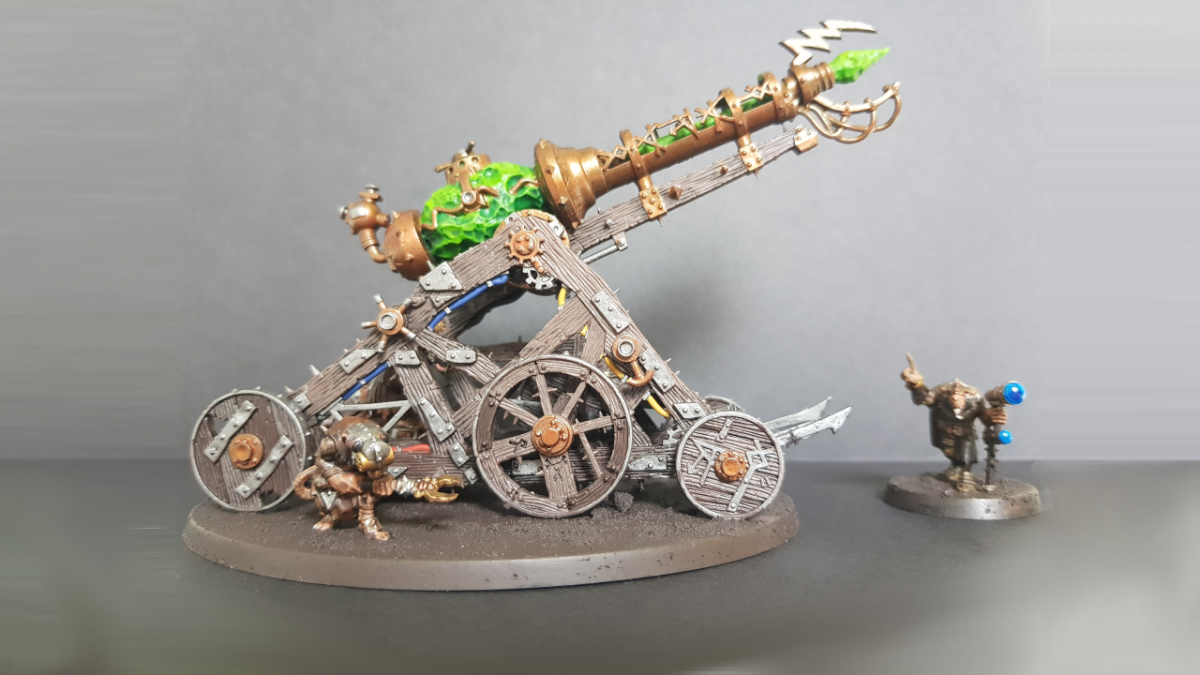
The Warp Lightning Cannon kit can be configured in two ways, one being the cannon, while the other, the Plagueclaw Catapult, is used to sling buckets of poisonous gunk at the enemy.
The Warp Lightning Cannon itself works by throwing green warp lightning bolts at the enemy. The energy itself is exceptionally dangerous and indiscriminate when unleashed. It is apparent that the technology is way ahead of anything the dwarves or the empire have at their disposal. Perhaps the main saving grace for anyone on the wrong end of it is that these lightning cannons are also hideously unstable and have the awkward tendency to explode due to their design.
A Plagueclaw Catapult on the other hand, is primarily a siege weapon, and not a very nice one at that. The Skaven Plague Monks create a toxic plague ridden matter loaded up with all sorts of nasties including corpses, diseases, toxic waste and bits of Warp Stone just to be nasty. The resultant insult when released from the catapult also unleashes a toxic cloud so dangerous, it can even bypass some forms of armour, and frequently kills its victims on contact.
Painting
For our basecoat, we’re going to use Rhinox Hide, applied using two thin coats to ensure a decent coverage without obscuring any of the important details. Once dried, apply Agrax Earthshade all over the model, ensuring that you work it into all the grooves and patterns. This will make the grain of the wood and a number of runic symbols carved into it become prominent.
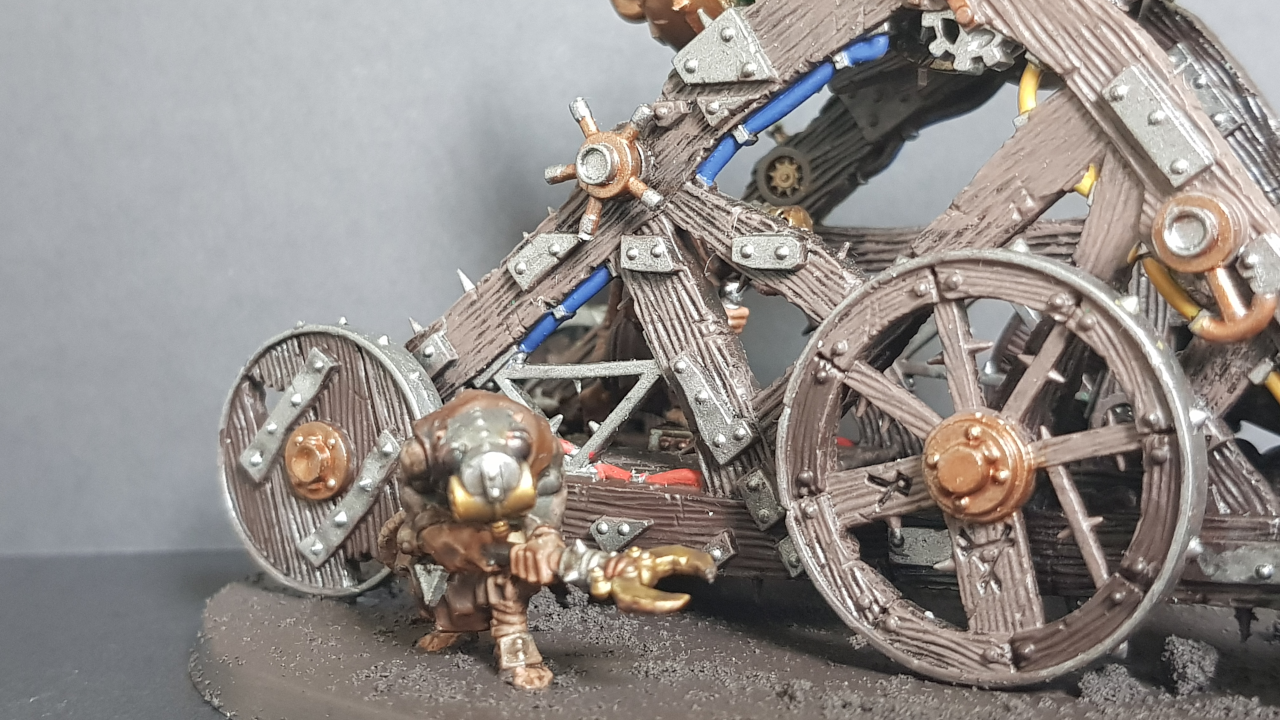
Give it about half an hour to settle, then gently graze a fine layer of Gorthor Brown all over the model with a flared brush. Get as much paint off the brush on a piece of blotting paper before you flick your brush all over the model. This ensures that the grain will become even more visible, and the end result is a careworn and solid wooden effect.
There are clearly defined planks on the footboards and within the wheel assemblies that are clear from the casting of the plastic, and it may be worth considering to use different shades of brown – Mournfang Brown or Dryad Bark for example – to accentuate the differences in tone between shades on the boards. This can be done at a later stage if you prefer.
The Warpstones set into the ornate brass barrel are the biggest contrasting feature here. For the main crystal, the tip of the cannon and the internal shaft running through the barrel, carefully apply Warpstone Glow.
Once dried, apply a liberal coating of Biel Tan Green shade paint over these areas. Give that half an hour or so to fully dry.
Next, carefully brush Moot Green over the edges of the crystals. This doesn’t take long to dry at all, sometimes within seconds of applying, at worst taking ten minutes to completely dry.
Tesseract Glow is applied to the crystals last of all. This is a relatively new technical paint from Games Workshop, and if it sits on the shelf for any length of time, it settles into two distinct layers which look quite cool in itself. Shake it well for at least a minute to fully mix these parts.
If you need a helpful trick, load a couple of small ballbearings into the pot. By giving it a good shake, these help mix the paint effectively without reacting with it. Once dried, it looks like it gives out an eerie glow, but alas it doesn’t glow in the dark. Trust me, I have tried! Even so, it is a weird green, absolutely perfect for this job.
With regards to the metal work around the wheels, cogs and other areas, Leadbelcher is used for the hard physical components, such as wheels rims, cogs and spikes. Screaming Bell is used on the parts of the more ornate cannon barrel, and other areas where brass would be used. If you look at early Industrial Revolution trains, such as Stephenson’s Rocket, brass and steel were often used together as an aesthetic.
You will also notice the odd electrical cable here and there around the cannon, seemingly held up by metal clips. For this cannon, I have used some primary base colours to highlight these, and used Leadbelcher on the clips.
The colours I have used for these cables are all base paints. Averland Sunset for yellow cables, Caliban Green, Jokeaero Orange, Mephiston Red, Macragge Blue and Nagarroth Night. Not essential, you could use Abbadon black for all of them, but being an engineer when not painting tiny rats, I kind of liked the idea of a haphazardous wiring job lashed up by rodents.

The crew of the cannon were added last prior to basing the model. This model comes with a captain with a rangefinder, and two engineer/mechanics. Here, the commanding rat has been situated on his own base. On the Lenses of the rangefinder that the gun captain is holding, Soulstone Blue has been used on the rangefinder to give a nice glass effect.
The clanrat with the spanner stands alongside the cannon, and the last but by no means least the little fellow pulling the lever has been stuck onto the cannon platform inside (the one with a box situated underneath). For more info on painting Clanrats, check out the Skaven Clanrats guide and accompanying YouTube video.
As before with the Clanrats, Stirland Battlemire has been used to base the cannon. You can add the odd splodge of Stirland Battlemud to compliment the mix.
On the tabletop
The Warp Lightning Cannon is a table top piece that I think adds a serious bit of weight to the Skaven army. It is also something of a poison chalice in Warhammer, sometimes controversial on the table.
The cannon can put out almost 3 volleys for every 2 the enemy can fire. However, in an artillery exchange, most of its other features such as range, magic damage and other factors end up being less useful, hence it balances out somewhat in a fight with other artillery systems used by Skaven opponents. Even so, they also have a faster projectile velocity than other forms of cannons, if you can call lightning a projectile of sorts – 25% faster in some instances, and its rate of fire playwise can be anywhere up to 50% faster in terms of Return Of Fire (ROF).
What I might do later is get two more Warp Lightning cannon kits, build another one, and a Plagueclaw to really make my Skaven clanrats a force to be reckoned with.
And finally…
One thing you must be with this particular model is to be careful of the blades at the front. During filming I dropped a camera on it and this broke off one of the blades. To top that, I also managed to stab myself in the finger with one. Won’t be needing any Blood For the Blood God paint on this job. Seriously, if you do snap one of the blades off, get a fine nail file pad, gently buff both ends, then glue together. Give it a few hours to fully cure and if done right, this shouldn’t be noticeable.